Saturday, October 15, 2016

Rebuilding the motor with the shredded seal


Some random pictures and thoughts as I rebuild the motor with the shredded stator seal.

Even though the "Shocko" cylinder still held good pressure, 160 psi, the Treatland Athena cylinder has better porting.


http://www.treatland.tv/honda-hobbit-70cc-athena-cylinder-kit-p/honda-hobbit-athena-70cc-kit.htm

When I used to race motocross, it used to cost me about $80 for a Wiseco piston and then about $80 for someone to bore the cylinder to match the piston I bought. I found that most places do not bore a straight hole or don't bother to match it to they piston I bought. So The Treatland kit seems like a pretty good deal.

The cylinder, in my opinion, still needs the ports chamferred. I run my finger against the ports and if the ports catch on my skin, I file them at an small round file, just to round the edge of the port by a small amount.


The quality of the porting is not perfect. We can see it in the rear boost ports.


I checked the ring end gap and it was 0.13mm. This is tighter than the 0.15mm spec, so I will pass a flat file across the ends for a few strokes. It won't take anything to knock 0.02mm off. I use a cheap pair of Amazon magnifying glasses, when I work on the chamfering the ports or looking at ring end gap.


Arrow on the piston points to the exhaust port. "N" or numbers or letters on the ring face up to the crown of the piston. There's a single ring on this piston. My history with running a single ring strokes, is they rev faster and make more horsepower, but don't last long. On 1986 TRX250R that I experimented with running a single ring, I ended up needing to changed the ring every two weekends of motocross.

The piston pin that was in the motor looked good, but I could detect ridges, so I am going to use a new piston pin.

The cylinder needs some fins cut if you are going to use the pre 2 speed oil fill bolt in the front of the motor. This is a picture of the Athena cylinder that is currently in my 1981 motor.


I used a right angle dremel tool cut the fins on the cylinder. Not my favorite solution, but it worked.


After cutting the fins and the chamfering, flush the cylinder out with lots of soap and water. Then lubricate the cylinder.


I am going to put an extra base gasket on the cylinder, to raise the cylinder, raise the port timings and lower the compression. When I used the 47.6mm Athena kit on the 1981 engine, I was getting some mild detonation in the mid range. I went to premium gas and this reduced it, but it was always still there. I had the head bolts repeatedly loosen up, so either the detonation or the cylinder pressure was probably lifting the head. I would rather have higher ports and I would like to target about 150 psi compression. This 0.7mm base gasket should give me another 27 thousands of clearance.


Treatland has 47.6mm metal head gaskets.


I am using a 47.6mm Airsal head from Treatland. This does not have a lot of cooling fin area, but through the summer in Atlanta, peak head temperature was 380F on the 1981 motor. This is not a great head temperature, but I can live with it.


The normal head bolts are M6x100 1mm thread flange bolts. These are too long for this head. On the buildup of the 1981 motor, I used Honda 95701-06090-00 M6x90 thread flange bolts:


I would like to use studs instead, but I have not searched around to find them yet. There is a small advantage to using studs in this application. As you are torquing down bolts, there is both a twisting and a tension force applied along the length of the bolt. When you have a stud, the twisting force along the stud is reduced and the torque that you are measuring at the torque wrench is largely the result of the tension force. You get a better torque measurement.

I don't have any M6x90 flange bolts, but I do have some M6x85 flange bolts, so I will try to use those.


I used a Honda Urban Express, NU50, reed cage with Carbon Fiber reeds. It takes a little bit of grinding on the cases to fit them, but they are bigger reeds. I pack the area around the intake before grinding the cases. Then after the grinding I thoroughly flush the lower end with vegetable oil.


I use an Motion Left Moped, MLM VM 20 Intake from Treatland. The VM20, even though it is a big carb, is similar to ones I used in the 80s and 90s and I know how to tune them. To match this up to the NU50 reed cage, I use an NU50 reed spacer and then grind the reed spacer to match the MLM output port. I use paint to imprint on the reed spacer where to grind away.


Saturday, October 8, 2016

Different Shock


I changed to a slightly larger tire on the back and discovered that it really improved the stability, especially about 30 MPH. I am thinking that is because it put a little more pressure on the front wheel. This made me interested in finding a shock with adjustable sag, so I can experiment with the amount of sag and consequently the rake and the amount of pressure on the front tire.

I found a cheap Chinese shock on Ebay to start with. It looks pretty close and mostly I just wanted spanner adjustable sag:


It's described as : 

PA 320mm 12 5/8" Clevis Shock Absorber Pit Bike Quad ATV Gokart Motorcycle Black


Saturday, September 24, 2016

Postmortem on First Engine Build

I currently have the third motor in the NC50.I have the original motor, stock, still runs. The first motor I built was pretty mild.It used a Treatland "Shocko" cylinder, stock cylinder head, MLM pipe, oil pump plugged, and initially a 15mm Delorto carb. Later I went to a 20mm Mukuni VM, because I was frustrated with the idle tuning by filing the slide. From 80s and 90s motocross, I was familiar with tuning that era's Mukuni's and even though I thought the carb was pretty big for the ports, especially the exhaust port. This motor would pretty consistently run a top speed of about 39 MPH. It started getting harder to start and I swapped it for the motor that is in there now.
I did a couple quick things when I pulled the motor.


  • I pulled the carb apart and there was some water and dirt in the bowl. At that point, I had been battling with water leaking down the On/Off valve on the gas cap. I run a separate external fuel filter, so I don't have a good reason for why the bowl had some dirt in it.
  • I pulled off the stator cover and there was oil. I was worried about that possibility. The crank seals are not very substantial, this motor spent most of its life at 10,000 RPM where the stock motor wouldn't rev much beyond the designed 7500 RPM and I had a slightly larger and heavier piston. My 80s Honda TRX250R quad, that I would race back in the stone age, I had making power beyond 10,000 RPM and it would loose a stator side crank seal multiple times a year. I used to have a habit of pulling the stator cover every weekend to look for oil.
  • I lost the output shaft seal on the engine and it started leaking oil out the output shaft and down onto the rear tire. (And I don't really understand this yet, since the seal looks OK.)
I am finally going to take a look in the motor to see if anything else failed.

The compression guage I have, has a long hose on it and this is a small cylinder. I will do two measurements. The first is just wind the starter up and record the pressure, which is about 60 psi. Then, probably the more meaningful measurement and just keep cranking the motor over until it reaches a peak number.

It peaks about 160 psi, which sounds pretty encouraging. The ring seal was holding.

Now I need to do a leak down test, but the square exhaust port will be somewhat problematic.I will probably need to seal it with Compsimold.

Leak down test, completely failed. It sounds like it is coming out of the stator side. I will pull the flywheel to look.

The stator side seal is shredded. You can see flakes of rubber laying down near the seal. It certainly shredded that seal.


Single crank of the motor gives about 60 psi. I am not sure this tells me anything, but I will keep the number.


Cranking the motor until the pressure peaks, I get 155 psi. Which tells me the rings probably survived.


No good way to block that exhaust port off since its a weird square shape. I will just fill it full of Composimold.


Heat up some Composimold and pour it in. Wait for it to cool.


Leak down test is a total failure, I can hear the air coming out behind the stator. It's important to use a low pressure so you don't blow out the seals. My old rule that I learned from my mentors is the two stroke bottom end should hold 5 lbs for 5 minutes.


Pull the flywheel with the a generic moped flywheel holder from Ebay.


You can't see it well in the picture, but that seal is really shredded. The left side, L-side, oil side, seal looks good. This seal is the reason it was hard to start. There are a couple possibilities and it make be a combination:

  • I have removed and blocked off the oil pump. This seal may get a lot more oil in a stock motor since the oil pump feeds that side of the engine.
  • This engine would run about 10K RPM, which is higher than the stock engine. It may be that the little seal just can't take the RPMs forever. I used to race ATV motocross back in the 80s and 90s. I ran TRX250Rs with a stock peak HP around 7500 RPM and I would set the engine up to build HP through 10K. I used to the stator side seal frequently, to the point I would pull the flywheel off a couple times a month to check the seal. This might just be RPMs.
  • I didn't have a seal driver for this little seal when I put this motor together. I know I put the seal in deeper than recommended and not totally straight. This is my best guess on the failure. I now have a seal driver that I am using to put these in.


Seal came out in three pieces. The seal spring was separated from the seal.


Saturday, June 25, 2016

Gas Tank Battles -- Round 2

The part of my NC50 that I have had the most problems with is the gas tank. After I got the NC50, I pretty quickly discovered that it would leak gas into the oil tank. The oil tank is just separated by a piece of metal inside the gas tank and my understanding is that it is fairly common for there to be leaks between the two. I disabled the oil pump and went to premixing the oil. I have always been a fan of premixing the oil, because it simplifies jetting when you don't have the oil pump doing its own thing to inject oil at its own rate. However, the oil site started leaking gas. No surprise, since the rubber seal is 40 years old and we weren't putting ethanol in the gas back then. Also even when I was running with the oil pump, the oil cap tended to want to pop out, even though the vent appeared to work by blowing through it. So I bought a second gas tank, punched holes between the gas and oil chambers, rust treated the tank and sealed the oil site with a supposedly gasoline resistant glue. Slowly, the gasoline ate through my gasoline resistant glue. I machined a interference fit aluminum plug to replace the oil site. This solved the oil site problem.

Then the gas cap fell off one day. The stock gas cap just has these two sheet metal tabs that hold it in place and I had damaged one of them. So I found a different design Honda gas cap with an on/off switch, that fit the tank, but had a much better holding mechanism. After several heavy rains, I found that water was getting into gas tank. Not much, but I don't want water in the gas. My thought is that it was getting down through the On/Off switch. I switched to an NU50 gas cap which doesn't have the On/Off switch. Unfortunately, this gas cap appears to pressurize the tank since now fuel weeps out of the oil cap.

Now I have switched back to the second, better designed, On/Off gas cap and I built interference plugs for the oil site, the oil cap and the oil tank outlet. I had a automotive vacuum cap on the oil tank outlet, which was working, but I could feel it getting softer and I think the gas with ethanol was taking a toll.

Here are some pictures of making the interference plugs for my spare tank. I will test it for a while and then do the original tank.

Here you can see the bubbles in the "gas resistant" tank glue that I tried to use seal the oil site. The gas was leaching around the oil site rubber and interacting with the glue.


The spare tank gas cap flange is not in the best shape. Somehow, I need to work on straightening it.


A view down into the oil tank.


A view of my vacuum plug that I used to seal the oil output.


Oil site with the glue removed.


I am going to order a new petcock. The one that is on the spare tank is an original Honda petcock. Most aftermarket petcocks come with a filter tube that is too long for the NC50 tank.


Oil site hole diameter is about 19.89mm.


Oil cap hole is about 23.77mm.


I just machined an interference fit plug with a little bit of a lip on it to act as a stop. Cleaned both the plug and the tank hole. Put some gas resistant epoxy on the plug and pounded it into the tank.


Another picture of measuring the oil site hole.


Close up.


Same thing here. I machined an interference fit plug with a lip on it. Put some gas resistant epoxy on it and pounded it into place.


Big rubber hammer to get it into the hole.


Finally the oil outlet.


I took a piece of bar stock that was pretty close and machined a taper on it.


Tapering the bar stock in the lathe.


Finish plug.


The epoxy I am using:


Setting the plug in place, ready to pound it in.


The oil outlet plug pounded down into the tank.


Tank is ready other than I am waiting on a new petcock. We will see how this tank works out.

After several weeks of running this tank. I am pretty happy. My NC50 has to sit outside, so I have to worry about rain getting into the tank. I have switched back to the NU50 gas cap and even though it seems to pressurize the tank slightly, everything is staying sealed.


I plan to modify the original tank the same way.


Sunday, April 24, 2016

Bigger Tire

Can I get a few MPH out of a bigger tire and will it fit?

Stock Tire, a spare rear rim and tire.


Trying a 2.5 inch tire:


Stock tire has a circumference of 58.25 inches. This tire has a circumference of 61.25 inches.

At 10,000 RPM the stock tire would give us:

38.79 MPH = 10,000 RPM * 58.25 / (14.220 overall engine gear ratio * 12 in/ft * 5280 ft/mile) * 60 minutes/hour

The bigger tire would give us

40.79 MPH = 10,000 RPM * 61.25 / (14.220 * 12 in/ft * 5280 ft/mile) * 60 minutes/hour

This tire would be good for roughly 2 MPH gain, assuming the motor has the power.


Tire is from Treatland.tv. 


Motion Pro spoons to put the tire on. These Moped tires are very easy to put on compared to changing dirt bike tires. I have even done them with my plastic bicycle spoons.


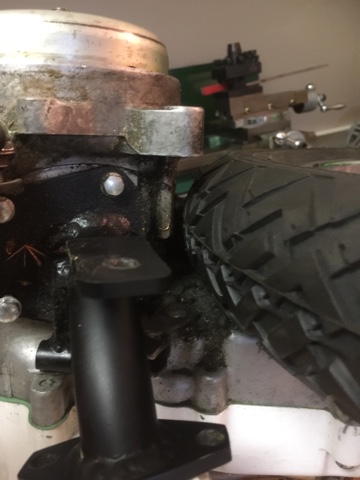
Mocking it up on a spare engine, it's really close.


Really have to think about where the magneto wires are going to run.


Looking at the scooter, I don't think it will work with the back fender on.


Back fender is already tight on the stock tire.

I did have to modify the rear fender a little bit. The back bracket was easy, I just bent it a little bit and bolted it down at a different angle. The front, I re-drilled the location of the bolt for the front bracket, to move the fender up and over one of the ridges on the motor. It clears the back tire, not by much, but it does clear.


Not a lot of room to spare, but after weeks of running this, it hasn't ripped the back fender off.

There was a big benefit. The Honda Express was really sketchy at 50 MPH (Yes, I have the poor little motor spinning over 13K, it's not making much power up there, but enough.) Putting the bigger back tire on it helped. The 2.5-14 tire only raises the back by about an inch, but I think that must put a little bit of pressure on the front wheel, since the stability at high speed improved significantly. This makes me want to find a shock with adjustable sag, that I can experiment with.

Also, some later Honda Express's came with a 40 MPH speedometer rather than a 30 MPH speedometer. This is a direct drop in replacement. With the bigger tire, the GPS and speedometer are pretty close. Even at speeds beyond 40 MPH, the speedometer seems behaved and you can tell whether if you are running 45 or 50.